To protect our system and computer we should make sure that data which we download is clean. Everytime we bring data to our system or user upload data such as file attachments, we must make sure that data is free from viruses and trojans.
If our system has sensitive data and critical for operation you have to be more cautious about bringing data to your system - cyber attack, nowadays, is being serious and cunning.
In a normal usecase, we set up Anti Virus (AV) scanner on a file system. AV scanner monitor our file system and RAM in real-time or batch. However, it cannot make sure that each file doesn’t have any malicious content in real-time. In this project, we will use two open source products to detect virus/trojan in realtime. We are going to use Apache Nifi and ClamAV
Apache Nifi is a very powerful, easy to use and stable system to process and distribute data between disparate system. Apache Nifi is a real time data ingestion platform, which can transfer and manage data transfer between different sources and destination systems.
ClamAV is an open source antivirus engine for detecting trojans, viruses, malware & other malicious threats.
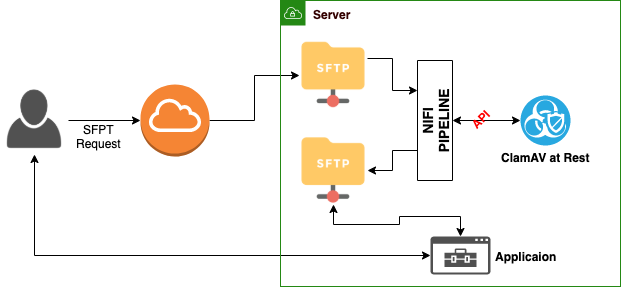
1. Usecase
A usecase is that user need to transfer some files to the applicaion, and we have to make sure that the files don’t contain any malicious codes or contents. Since this is not bulk transformation, we want to transfer a file to endpoint in realtime after scanning. A diagram below is a high level work flow of this usecase.
2. Setting Nifi Server
There are many different ways that you could set up Nifi server depending on the operating system. In this project, I am using Ubuntu 16.04.
Updating and Upgrading apt-get
1 | apt-get autoclean |
Installing Java (JRE)
Apache Nifi is built on Java. We have to have java installed in the system
1 | apt install oracle-java8-installer -y |
Installing Nifi
1 | wget "https://www-us.apache.org/dist/nifi/1.10.0/nifi-1.10.0-bin.tar.gz" |
Set JAVA_HOME
1 | vim ~/.bash_profile |
Start/Stop Apache Nifi
1 | /opt/nifi/bin/nifi.sh start |
Get Started
You should open a browser to access NiFI GUI.
1 | default |
If you need to change port:
1 | vi /opt/nifi/conf/nifi.properties |
If everything is good you should be able to see this screen.

2. Setting ClamAV Server at rest
We are going to deply a virus scanner and make it usable in a server at REST. Even though we have multiple applications like one for email attachment, SFTP, etc., we just need to deploy a AV scanner for many applicaions.
Simple Clam AV REST Proxy. This will be built on top of clamav-java. Pleas fine more detail here.
We need two containers. One is ClamAV daemon as a Docker images. It builds with a current virus database and runs freshclam in the background constantly updating the virus signature database. clamd itself is listening on exposed port 3310.
Another one is the server implementation. This is a precompiled and packaged docker container running the server. You also need the ClamAV virus scanner for the REST endpoint.
To run use something like this.
- Start ClamAV server, using https://hub.docker.com/r/mkodockx/docker-clamav/ here
docker run -d --name clamav-server -p 3310:3310 mkodockx/docker-clamav - Test that it’s running ok:
curl localhost:3310UNKNOWN COMMAND - Start the REST API image, clamd-server docker container linked to this container.
docker run -d -e 'CLAMD_HOST=clamav-server' -p 8080:8080 --link clamav-server:clamav-server -t -i lokori/clamav-rest - Test the REST api:
curl localhost:8080Clamd responding: true
Testing the REST service
You can use curl as it’s REST. Here’s an example test session:
1 | curl localhost:8080 |
EICAR is a test file which is recognized as a virus by scanners even though it’s not really a virus. Read more EICAR information here.
3. Design Dataflow in Nifi
In our previous discussion, we’ve setup nifi server.
We’ll use three processor to make it working. GetFile, ExecuteStreamCommand, RouteOnAttribute and PutFile. GetFile and PutFile can be chnaged to any endpoint of your application. For example, we could get a file from SFTP and put file to HDFS.

I would like to focus on ExecuteStreamCommand becase rest of processors are straight forward. Please find more information about those processors from an offical Apache Nifi Website.
ExecuteStreamCommand will executes an external command on the contents of a flow file, and creates a new flow file with the results of the command. We will use Python. Therefore, when files are come from GetFile Nifi will execute a python script to check the virus via API from ClamAV server. You should install python properly in your Nifi server.

This is a configuration of Command Arguments
Command Pathis where your python command located.Working Directoryis where your python script is located.Command Argumentsis your python scriptOutPut Destination AttributeMake sure that you define this value because we have to keep our content of file. By doing so we will write the result of scanning as an attribute. And then we will sort out files throughtRouteOnAttributeprocessor.
Let’s take a look our python script.
1 | import sys |
If a file is clean, it will have an Attribute value True. If it’s not an attribute value will look like this FalseTrue . We will route our files based one this value. Let’s check the configuration of RouteOnAttribute.

It will let your nifi to send your files to next processor only if the files are clean.
4. Conclusion
It might not be only way to do this process. However, both Nifi and Clam are open source, so we don’t need to purchase any other license like Mcafee. Also with these simple tools we could process the files in realtime, and it works fairly well! Hopefully you enjoy this article. If you have a question or comment, you are very welcome to email me at any time.